printables
The Love Potato: A Unique Valentine's Day Craft Activity
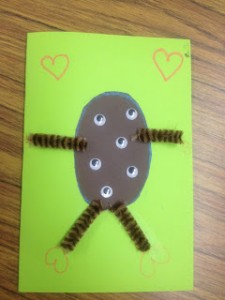
The “love potato” is an awesomely “delightfully awkward” Valentine’s Day Craft that kids and parents alike think is hysterical and definitely unique. The front of the card is a potato with googley eyes all over it, and inside it says “Dear X, I have eyes only for you. Be My Valentine? Love, Kid”.
The “Love Potato” Valentine’s Day Craft Activity
Supplies: construction paper, googley eyeballs, writing/drawing utensils, scissors, glue, pipe cleaners or other item for arms/legs, imagination
Directions:
Choose color of card paper. Fold the paper in half to make the card.
Open card to do message first. Copy or compose the message, making sure to include “I have eyes only for you.” within it.
Draw a potato on a separate piece of brown construction paper. Cut out potato. Glue potato to front of card, in the middle. Add adhesive googley eyeballs to it (dollar store).
Carefully cut pipe cleaners [best by adult] for arms and legs, or use construction paper, crayons, anything else to add in arms/legs. Glue arms and legs of whatever material onto the potato.
Give to cherished person. Smile.
TO GRADE ACTIVITY (change difficulty level) depending on child’s strengths/weaknesses:
Sequencing:
Harder: Show finished product, have child determine sequence of steps (folding/cutting/gluing etc)
Easier: Have a finished product to show, but then do the task step by step with the child, so that task is broken down and child is given sequence.
Following Directions:
Harder: Have no supplies out besides finished product, have kids gather necessary supplies, ideally ones out of sight that require some instruction to find. Provide child minimal instruction and give more than 2 (ideally 3-4) instructions at a time.
Easier: Provide all or most supplies or have easily accessible. Give no more than 1-2 step directions at a time.
Folding:
Harder: Have child perform folding task independently
Easier: Demonstrate how to match corners, and/or perform for child.
Writing:
Harder: Have child make own lines with ruler, and compose without verbal or visual cues. Or have child copy information off board.
Easier: Have written model of desired writing, at “near-point” meaning right in front of the child, for child to copy.
Cutting:
Harder: Thinner potato lines to cut out, or have child cut out arms and legs as well.
Easier: Thicker potato lines, higher-contrast.
Gluing:
Harder: Liquid glue (hard to regulate pressure/squeeze hard enough).
Easier: Ideally a colored glue stick. Ensure child is adding to glue to back of potato, not to card front.
Eyeballs (educate that potatoes have “eyes”)
Harder: Have child pull off own eyeballs, especially smaller ones. If you don’t have the adhesive kinds, putting glue on the eyeballs is hard/good practice. If adhesive, taking the tiny paper off back can be challenging.
Easier: Provide eyeballs off chart, or use larger eyeballs.
Imagination:
Be silly! Kids think this is so funny.
SKILLS worked on with Love Potato activity:
- Cutting
- Gluing
- Folding
- Following directions
- Composing and/or copying writing
- Fine motor manipulation (googley eyeballs plus typical manipulation)
- Imagination/creativity/flexibility
- Cognition/Problem-solving including sequencing and following directions
OT Lego Strategies for Children
Dear OT,
My preschooler, John, loves playing with Legos. Unfortunately he gets frustrated because his hands are weak and his fine motor skills aren’t as good as his classmates. Any ideas? – Jane
Hi Jane,
Legos are great for working on many developmentally appropriate skills. Some strategies you can teach your child to make Lego play a little easier include:
LEGO STRATEGIES (Click link to download as PDF) Lego strategies
(Note: Consider practicing on larger Legos first!)
PLACE LEGOS LOWER AND CLOSER TO BODY
Place the legos closer to his body and make sure they are lower than his arms. He can stand up and push down on the Legos for more strength (thanks to the physics of levers – this is true for staplers and similar items as well). That way his entire body is being used for the interlocking of the bricks, compensating for his hand weakness.
USE PALM, NOT FINGERS, TO FULLY INTERLOCK
For the bigger pieces, if interlocking bricks are in correct position, just not fully pushed together, first move the item closer and lower as noted above, then use the flattened palm of hand to press them down firmly. The palm has more force/easier than the fingers. If a tower, it may need to be stabilized with the other hand to prevent tipping over.
TEMPORARILY MOVE UNSTABLE AREAS TO A STABLE AREA TO ADD ON MORE PIECES
If there is empty space beneath part of a Lego due to the design, it can get difficult/frustrating to add onto that Lego area. Temporarily remove that part of the design so that it’s fully on the flat/stable surface. Add on the necessary extra pieces. Then place the entire part back where it belongs.
Jane, I hope this helps. I imagine there are many sites on the Internet that can be explored to find even more ideas. Good luck with John! Therapeutically yours, OT 🙂
PS: There are plenty of OT skills that can be worked on using Legos! Fine motor, visual motor, problem-solving, social skills…let me know if you want more information!


