Parents
Lava Paper: Dramatic Game Paper make learning handwriting more fun
Pediatric OTs or parents: If you’re working with a child who is highly intelligent but has poor handwriting and one of the reasons is that they are bored/don’t care about sizing rules….this “lava paper” (game paper) is for you.
Easy Ways to Teach Your Child Problem-Solving Skills
Does your child get upset easily over small and easily fixable things, like a ball rolling under a table? It may be because he doesn’t realize he has any power to fix the problem. Luckily, you can teach him to feel more empowered. I introduce to you the PSST Method!
Download the PDF of this here: The PSST! Method: Teach Your Child How to Problem Solve
Or just read on.
The PSST! Method: Teach Your Child How to Problem Solve
Children who feel confident in their problem-solving abilities can better tolerate and handle unexpected events. All children of any age can benefit from learning problem-solving skills. Adjust your language or extent of experimentation based on your child’s age/ability/tolerance level. The steps stay the same. (Ideally, use them all in order. But using any is great.)
SAMPLE PROBLEM: Young John’s ball just rolled under the couch. John scrunches up his face, ready to cry. Daddy jumps up to go grab a broom handle and solve the problem.
WAIT! John needs to learn the steps BETWEEN the problem and a successful solution.
- Pause. Just briefly. See if the child will attempt to problem-solve. If not, proceed to step two. Eventually, your child may make the attempt.
- Frame the Problem. “Wow, the ball rolled under the couch, and we can’t reach it.” You can also provide “emotion” and “help” words. “Your face is turning red and you look really frustrated. You can say, “Please help me solve this problem.”
- Play “Dumb.” Whether you instantly have a solution or not, you can pretend you’re not quite sure what to do. Crinkle up your forehead and look thoughtful. “Hmmm….”
- Think Out Loud. Most adults problem-solve in their heads. If you can role-model the problem-solving process, you’re giving him valuable insight, and showing that it’s not magic. “The ball’s is under the couch. We have to get it out somehow…maybe we can try…” With an older child, you can ask them if they have any ideas.
- See What Happens. You may know that your hand won’t fit or his arm can’t reach, but he doesn’t. When it’s feasible to experiment (not a safety hazard or massive inconvenience), try it out. He learns a lot more that way. “Let’s see if your arm is long enough. Can you lie down and reach for it?”
- Repeat Steps # 4 (Think Out Loud) and #5 (See What Happens), until problem solved. “That didn’t work because the ball’s too far away, will my hand work? …No, too big. Hmm, maybe something small but long to help us get the ball.. see if this will work…no….hmm…let’s see if we can find something…oh, let’s try a broom handle!”
- Frame the solution. “The ball rolled under the couch and we were really frustrated and we didn’t know what to do. But we tried lots of ways to solve the problem and now we have our ball back. We are great problem-solvers!”
Repeat this process regularly. As he becomes more proficient, you can take more of a back seat to the problem-solving process.
Bonus: Consider sprinkling “What If’s?” into your conversations/play time. “We solved that problem! What if the ball landed in a tree? Or this hole? Or under the bed?” Talking is great, acting it out is even better. Play a game called “Problem-Solving Superheroes” where you deliberately practice these kinds of things.
Good luck – let me know how it goes!
PS: This method may seem obvious to you – but many caregivers would benefit from the reminder.
Interested in practical adaptive equipment design?
See flyer here:
Homemade Customized Adaptive Equipment
My lovely friend Beth has been working on practical adaptive equipment – creating it at a fraction of the cost of commercial design. I copied the following text from the flyer: “I want to customize or build adaptive items for children with special needs. My dream is to have a workshop where families, teachers and designers can meet. Footrests, booster seats and supportive seats can be purchased from special needs catalogs but they are generally hundreds of dollars. I make most items out of extra strong cardboard, plastic, fabric and foam. They are inexpensive, light-weight and last a long time. I took cardboard construction classes at the Adaptive Design Workshop in New York City. The founder, Alex Truesdell, won a McArthur Award for her work. Many students who take the class are interested in starting their own workshops. It really helps to have experience building things.
What products do your kids need most? What features do you need that you can’t find? What do you want but can’t afford? I would love to hear your ideas. I’m not in business yet. I just learned that product liability insurance costs a minimum of $3500 per year. (On top of general liability insurance.) I may have to find or create a position at an existing company or organization that already serves the special needs population. Apparently, the price of insurance is stopping many of my fellow students. Connections are welcome!”
Her contact information is provided in the flyer. If you have any interest in adaptive design, or want some ideas or to know more about her work, you should definitely connect with her.
Encouraging Self-Advocacy in Young Children
In my (former) work as a school-based occupational therapist, I was saddened daily at the lack of self-advocacy in the majority of the children I was treating. I provide the following as a (fictionalized but typical) scenario where I help teach self-advocacy.
The background information: Sam is 6 years old and in first grade. He spent two months in the NICU due to prematurity and gastrointestinal issues. He has mild motor developmental delays. He is small and adorable, and everyone feels protective of him. His parents, teachers, and peers are always quick to do things for him. He is cognitively intact, although his executive functions have been somewhat blunted through his early learned helplessness, the passivity that accompanies it, and the compensation by people in his environments. He is uncertain of his own abilities. He receives OT once a week through the school system.
Scenario: Sam is sitting at the table. I hand him a piece of paper and tell him to “sign in” (which he does every week). I deliberately turn away and start rummaging through things, clearly busy. After about 30 seconds I turn around and he is still sitting there, and hasn’t signed in.
“Sam, why didn’t you sign in?” I ask.
“I didn’t have a pencil.”
“Oh!” I say in over-exaggerated surprise. I dramatically retrieve a pencil for him “Next time, please tell me right away that you need a pencil!”
We move on.
Next week, I repeat the scenario. I hand him his paper, tell him to sign in, and start to turn away.
This time, he instantly says “I need a pencil!”
I smile and super happily say “Oh! I forgot! Thanks so much for asking! Here you go!”
We continue to work on similar examples each week. Often I am distracted or make lots of mistakes! Luckily, he helps me stay on track by letting me know what he needs.
Sam, like many consumers, was unaware of his power to ask for what he needs. With guidance and education, he is learning how to be a self-advocate.
Playful Pediatric Car Activities Using Road Clothes!
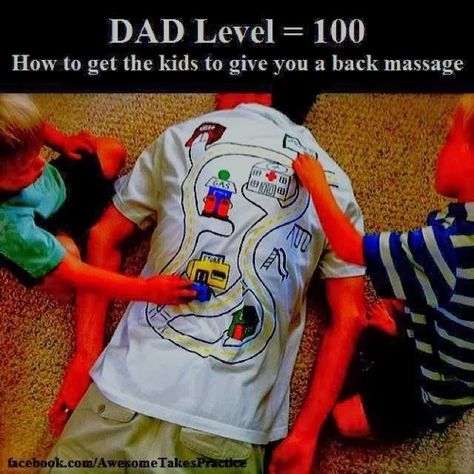
Found this silly picture with the dad wearing a road t-shirt and getting a “car massage” by his children. If you made a child some road pajamas (long-sleeved white shirt and pants and then drawn on with fabric Sharpies or the equivalent), you could do some great occupational therapy work.
Because this does involve “on-body” play, remember to be extremely careful about liability and consider only using this activity when parent is present, so that you can role model how to play at home, and ensure child is comfortable and able to express preferences.
Possible Activities:
PROPRIOCEPTION/TACTILE: Use cars of varying weights for lighter versus heavier touch as you narrate your path (…now we’re cruising along Right Leg Lane, looking for ducks…”) Super light touch: use your two fingers to “walk” as a pedestrian on the sidewalk Heavy touch: Use a heavy beanbag as a bull-dozer and “roll” it along its path
TACTILE: Make the path long and straight down both arms and both legs – if a child doesn’t normally like to put on long sleeves/pants, maybe he would if the car otherwise has to come to a screeching halt so soon on the journey.
STRENGTH: Make path circular around the legs and arms – make child lift up arms/legs for car to travel underneath “ooh your leg is soo heavy, my car is stuck, help!”
RANGE OF MOTION: The car can go down to the hand and and decide it wants to go to the other hand by having child raise both arms up 90 degrees and meeting at midline; the car may need other types of bridges from foot to hand and avoid the “body of water”
DIRECTIONS/ORIENTATION: Have child direct car or vice versa to go south/north/left/right/start at Right Arm Avenue etc
GRADATION OF MOVEMENTS: Have child practice on another child, or on your own long-sleeved shirt (or use washable marker on your arm only), of slow/fast/slower/faster
TURN-TAKING: Switch the car back and forth between the two children or you and child, potentially making a bridge, etc
BALANCE: Consider having the child stand up while the car drives!
More occupational therapy related pins here:
https://www.pinterest.com/funkist/ot-ideas
Magnetic Dry Erase Slant Boards
I really like their magnetic dry erase slant boards for children/adults who benefit from the slant, often due to visual or physical issues – the boards are thin and easy and awesome. I used it all the time, and am buying a new one as I had to give up my former one! They are currently $30 or cheaper if you buy more than 1, but they are going up to $33 starting January 1st.
I wanted to do a good review with lots of pictures and all, but sorry, for now, click on the link, see what you think. It’s straight forward. 🙂 So that you can get one as Christmas presents or before the new pricing goes into effect. I just wish the shipping were cheaper. They are in San Diego though so I am going to see if I can pick mine up.
Enjoy!
OT lifehack: Great adaptive doorstop
Most doorstops require bending over, which can be a fall or injury risk. Using the equivalent of a stable fire poker as a doorstop allows you to move the doorstop more easily.
Handmade creative clay pencil grips
To make a creative pencil grip, take the ink part out of a pen, roll it into a polymer oven-bake clay and bake it, following directions you can find online for safety [using appropriate clay, not burning your house down or experiencing toxic fumes by baking it too long, etc]. Here’s a tutorial. Here’s another. Those tutorials show a more covered pen, but I think the grip is better off being wound around the pen like in my pictures below. At least the tutorials give you the basics. I haven’t tried it myself. Use your own judgment as to whether it’s a safe and appropriate activity and method.
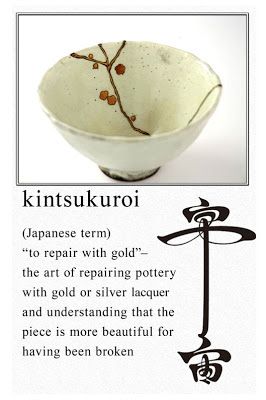
Occupational Therapists and Kintsukuroi: Repairing with Gold.
As occupational therapists, we often work with those who feel broken. Sometimes I think applying or receiving the lacquer of repair – and seeing the beauty in it – helps us restore our souls.
OT Lego Strategies for Children
Dear OT,
My preschooler, John, loves playing with Legos. Unfortunately he gets frustrated because his hands are weak and his fine motor skills aren’t as good as his classmates. Any ideas? – Jane
Hi Jane,
Legos are great for working on many developmentally appropriate skills. Some strategies you can teach your child to make Lego play a little easier include:
LEGO STRATEGIES (Click link to download as PDF) Lego strategies
(Note: Consider practicing on larger Legos first!)
PLACE LEGOS LOWER AND CLOSER TO BODY
Place the legos closer to his body and make sure they are lower than his arms. He can stand up and push down on the Legos for more strength (thanks to the physics of levers – this is true for staplers and similar items as well). That way his entire body is being used for the interlocking of the bricks, compensating for his hand weakness.
USE PALM, NOT FINGERS, TO FULLY INTERLOCK
For the bigger pieces, if interlocking bricks are in correct position, just not fully pushed together, first move the item closer and lower as noted above, then use the flattened palm of hand to press them down firmly. The palm has more force/easier than the fingers. If a tower, it may need to be stabilized with the other hand to prevent tipping over.
TEMPORARILY MOVE UNSTABLE AREAS TO A STABLE AREA TO ADD ON MORE PIECES
If there is empty space beneath part of a Lego due to the design, it can get difficult/frustrating to add onto that Lego area. Temporarily remove that part of the design so that it’s fully on the flat/stable surface. Add on the necessary extra pieces. Then place the entire part back where it belongs.
Jane, I hope this helps. I imagine there are many sites on the Internet that can be explored to find even more ideas. Good luck with John! Therapeutically yours, OT 🙂
PS: There are plenty of OT skills that can be worked on using Legos! Fine motor, visual motor, problem-solving, social skills…let me know if you want more information!


