
Activities
10
May
2019
Lava Paper: Dramatic Game Paper make learning handwriting more fun
Pediatric OTs or parents: If you’re working with a child who is highly intelligent but has poor handwriting and one of the reasons is that they are bored/don’t care about sizing rules….this “lava paper” (game paper) is for you.
Category: Activities, Clients/Consumers, Current OT Students, Educators, Occupational Therapy, Parents, Therapists | Comments: none | Tags: Activities
10
Aug
2016
Easy Ways to Teach Your Child Problem-Solving Skills

Does your child get upset easily over small and easily fixable things, like a ball rolling under a table? It may be because he doesn’t realize he has any power to fix the problem. Luckily, you can teach him to feel more empowered. I introduce to you the PSST Method!
Download the PDF of this here: The PSST! Method: Teach Your Child How to Problem Solve
Or just read on.
The PSST! Method: Teach Your Child How to Problem Solve
Children who feel confident in their problem-solving abilities can better tolerate and handle unexpected events. All children of any age can benefit from learning problem-solving skills. Adjust your language or extent of experimentation based on your child’s age/ability/tolerance level. The steps stay the same. (Ideally, use them all in order. But using any is great.)
SAMPLE PROBLEM: Young John’s ball just rolled under the couch. John scrunches up his face, ready to cry. Daddy jumps up to go grab a broom handle and solve the problem.
WAIT! John needs to learn the steps BETWEEN the problem and a successful solution.
- Pause. Just briefly. See if the child will attempt to problem-solve. If not, proceed to step two. Eventually, your child may make the attempt.
- Frame the Problem. “Wow, the ball rolled under the couch, and we can’t reach it.” You can also provide “emotion” and “help” words. “Your face is turning red and you look really frustrated. You can say, “Please help me solve this problem.”
- Play “Dumb.” Whether you instantly have a solution or not, you can pretend you’re not quite sure what to do. Crinkle up your forehead and look thoughtful. “Hmmm….”
- Think Out Loud. Most adults problem-solve in their heads. If you can role-model the problem-solving process, you’re giving him valuable insight, and showing that it’s not magic. “The ball’s is under the couch. We have to get it out somehow…maybe we can try…” With an older child, you can ask them if they have any ideas.
- See What Happens. You may know that your hand won’t fit or his arm can’t reach, but he doesn’t. When it’s feasible to experiment (not a safety hazard or massive inconvenience), try it out. He learns a lot more that way. “Let’s see if your arm is long enough. Can you lie down and reach for it?”
- Repeat Steps # 4 (Think Out Loud) and #5 (See What Happens), until problem solved. “That didn’t work because the ball’s too far away, will my hand work? …No, too big. Hmm, maybe something small but long to help us get the ball.. see if this will work…no….hmm…let’s see if we can find something…oh, let’s try a broom handle!”
- Frame the solution. “The ball rolled under the couch and we were really frustrated and we didn’t know what to do. But we tried lots of ways to solve the problem and now we have our ball back. We are great problem-solvers!”
Repeat this process regularly. As he becomes more proficient, you can take more of a back seat to the problem-solving process.
Bonus: Consider sprinkling “What If’s?” into your conversations/play time. “We solved that problem! What if the ball landed in a tree? Or this hole? Or under the bed?” Talking is great, acting it out is even better. Play a game called “Problem-Solving Superheroes” where you deliberately practice these kinds of things.
Good luck – let me know how it goes!
PS: This method may seem obvious to you – but many caregivers would benefit from the reminder.
Category: Activities, Clients/Consumers, Current OT Students, Educators, Occupational Therapy, Parents, Therapists | Comments: none | Tags: Activities
17
Jan
2015
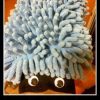
Weighted Hedgehog: OT Sensory Tool

This weighted hedgehog is so simple to make. A sensory tool you can make extremely quickly and for less than $10.
Materials:
1. Car-wash-mitten (often found in CVS $1-4 section or dollar store).
2. Eyeballs (If the sleeve isn’t black, you can Sharpie them).
3. Beans/rice/whatever weighted item you want, double-zipped in high-quality zip-lock.
How to Make:
1. Stick the ziplocked weighted material into the mitten.
2. Put on eyeballs!
3. Sew shut the mouth, or if you are sewing-challenged like me, I first used velcro until a friend helped me out. It only takes a minute or two.
Uses:
Have the hedgehog sit on their laps or by their side. Stroke the textured surface and feel the (mild) calming weight. I can see this being nice for a child who is resting and wanting to touch something. It’s a sensory tool, tactile with texture and proprioceptive with weight.
You could probably also throw it as a form of ball with older children who can handle weight being thrown, to make it more sensory-motor!
*It can be a choking hazard if taken apart, or potential suffocation hazard. Please supervise if used with younger children.
Want to print it/download the PDF of this? Weighted Hedgehog Making
17
Jan
2015
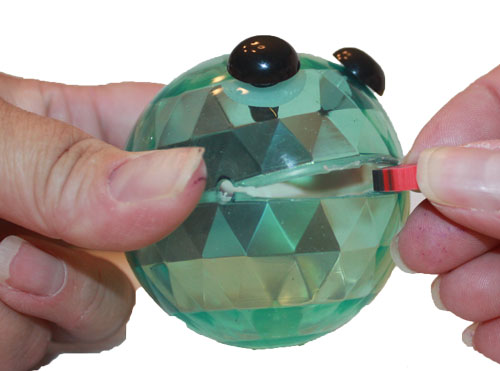
OT Invention Munchy Balls: Fine Motor/Sensory Motor Play
Occupational Therapist Tonya of TherapyFunZone.com invented this awesome toy. You can check it out here and buy it in her online store.She has quite a few posts with ideas on how to use it, including messy sensory play and kinetic sand. I also included a few pictures of it being naughty. 🙂 I’ve played with it myself (cough) and with my OT kids, and it’s a hit. Very similar to tennis ball head, but A) pre-made so you don’t lose fingers, and B) Waterproof/nicer material.
Oh, and when you buy it? She has all sorts of digital downloads (including my lava paper for $1) and other fun games, super cheap. I know this sounds like an advertisement, but it’s more trying to share great resources by great OT. I recommend this parents, schools, and pediatric occupational therapists.
16
Jan
2015
OT Lifehack: No more hook marks on your softer clothes
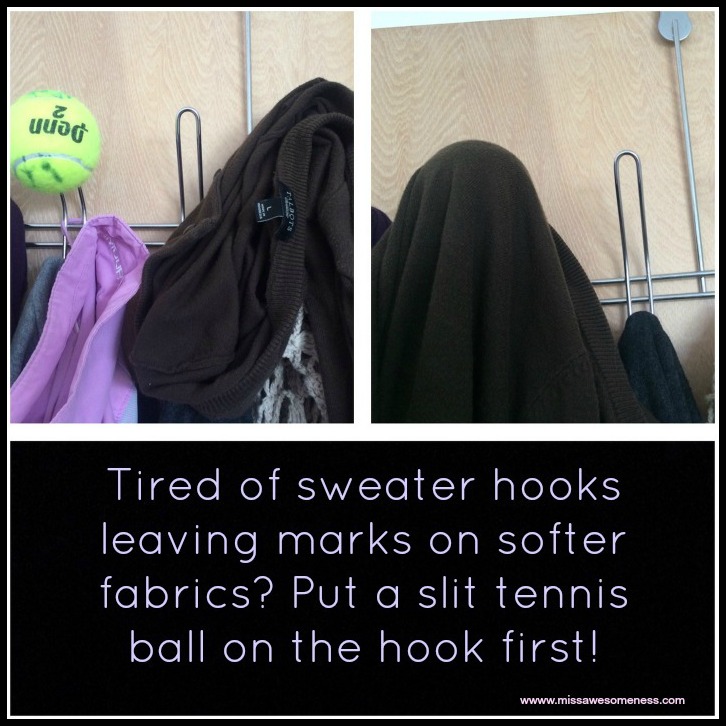
I dislike how softer fabrics get pinched marks in their clothes if left on a hook. I drape my sweaters over instead, but it takes up a lot of space. I realized that my little pediatric “tennis ball head” for kids, with the slit in it for a mouth, could help me out! Check out the picture…
Now, I don’t know if lint will be an issue yet, but you could always buy this vinyl version (Munchy Ball), pre-made, from TherapyFunZone to avoid that issue.
Category: Occupational Therapy | Comments: none | Tags: Activities, activity, lifehack, Occupational Therapy
11
Aug
2014
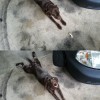
Quick, easy, creative activity: Visual-motor rubber band play
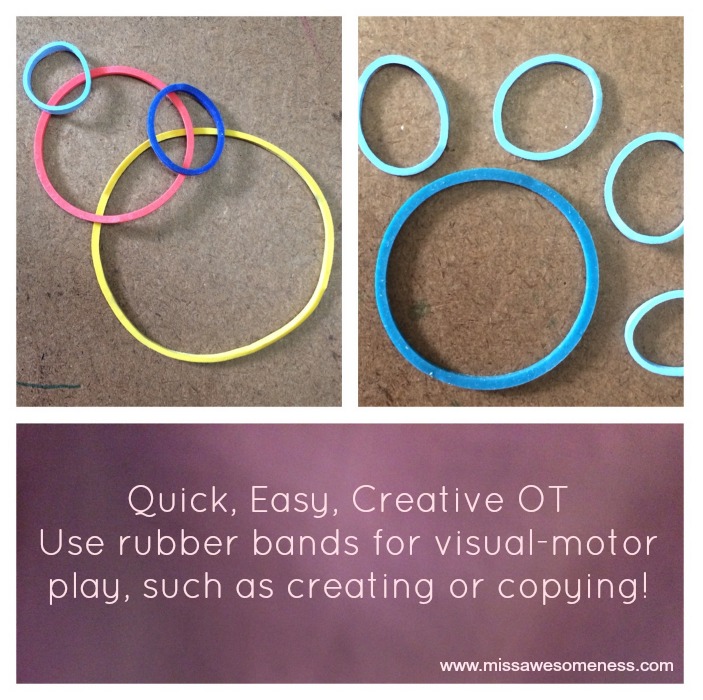
Quick, Easy, Creative OT.
Use rubber bands to work on visual-motor skills! This can be fun and imaginative and a great idea when your options are limited. You can have the child “create” something such as the dog paw seen above on the right, or you can have the child “copy” something! You can focus on figure-ground, spatial orientation, creativity, spatial language (is the blue band under or on top of the red band?), etc! Try to keep this activity play-based. Maybe the bands are actually “bubbles” or you’re giving the dog paw a high-five by placing another dog paw directly on top, whatever. The task can be the same, but the language/drama surrounding it can turn it into play!
Category: Occupational Therapy | Comments: none | Tags: Activities, activity, rubber bands, visual motor
10
Feb
2014
The Love Potato: A Unique Valentine's Day Craft Activity

The “love potato” is an awesomely “delightfully awkward” Valentine’s Day Craft that kids and parents alike think is hysterical and definitely unique. The front of the card is a potato with googley eyes all over it, and inside it says “Dear X, I have eyes only for you. Be My Valentine? Love, Kid”.
The “Love Potato” Valentine’s Day Craft Activity
Supplies: construction paper, googley eyeballs, writing/drawing utensils, scissors, glue, pipe cleaners or other item for arms/legs, imagination
Directions:
Choose color of card paper. Fold the paper in half to make the card.
Open card to do message first. Copy or compose the message, making sure to include “I have eyes only for you.” within it.
Draw a potato on a separate piece of brown construction paper. Cut out potato. Glue potato to front of card, in the middle. Add adhesive googley eyeballs to it (dollar store).
Carefully cut pipe cleaners [best by adult] for arms and legs, or use construction paper, crayons, anything else to add in arms/legs. Glue arms and legs of whatever material onto the potato.
Give to cherished person. Smile.
TO GRADE ACTIVITY (change difficulty level) depending on child’s strengths/weaknesses:
Sequencing:
Harder: Show finished product, have child determine sequence of steps (folding/cutting/gluing etc)
Easier: Have a finished product to show, but then do the task step by step with the child, so that task is broken down and child is given sequence.
Following Directions:
Harder: Have no supplies out besides finished product, have kids gather necessary supplies, ideally ones out of sight that require some instruction to find. Provide child minimal instruction and give more than 2 (ideally 3-4) instructions at a time.
Easier: Provide all or most supplies or have easily accessible. Give no more than 1-2 step directions at a time.
Folding:
Harder: Have child perform folding task independently
Easier: Demonstrate how to match corners, and/or perform for child.
Writing:
Harder: Have child make own lines with ruler, and compose without verbal or visual cues. Or have child copy information off board.
Easier: Have written model of desired writing, at “near-point” meaning right in front of the child, for child to copy.
Cutting:
Harder: Thinner potato lines to cut out, or have child cut out arms and legs as well.
Easier: Thicker potato lines, higher-contrast.
Gluing:
Harder: Liquid glue (hard to regulate pressure/squeeze hard enough).
Easier: Ideally a colored glue stick. Ensure child is adding to glue to back of potato, not to card front.
Eyeballs (educate that potatoes have “eyes”)
Harder: Have child pull off own eyeballs, especially smaller ones. If you don’t have the adhesive kinds, putting glue on the eyeballs is hard/good practice. If adhesive, taking the tiny paper off back can be challenging.
Easier: Provide eyeballs off chart, or use larger eyeballs.
Imagination:
Be silly! Kids think this is so funny.
SKILLS worked on with Love Potato activity:
- Cutting
- Gluing
- Folding
- Following directions
- Composing and/or copying writing
- Fine motor manipulation (googley eyeballs plus typical manipulation)
- Imagination/creativity/flexibility
- Cognition/Problem-solving including sequencing and following directions
Category: Occupational Therapy | Comments: none | Tags: Activities, activity, craft, cut, googley eyes, handwriting, love, potato, printable, printables, Valentine's Day
22
Jan
2014
Affirmations for Children/People with Low Self-Esteem
Multiple affirmations and lively beat
These downloadable mp3s are positive affirmation chants, specifically made for me on request by famed drummer Russell Buddy Helm. I had them made for my children who receive occupational therapy services, children who often struggle with low self-esteem. Although they are great for all children and adults alike. While these “power songs” can be chanted or focused on, the intent is for it to eventually just play in the background, if not annoying to the child.

Category: Occupational Therapy | Comments: 2 | Tags: Activities, affirmation, affirmations, anxiety, arousal, attention, beat, calm, chants, creativity, drumming, flexibility, focus, low self-esteem, metronomic, music, neurolinguistics, occupational therapist, occupational therapists, Occupational Therapy, OT, OTS, patient perspective, pediatric intervention, positive, power, power song
7
Jan
2014
OT Lego Strategies for Children
Dear OT,
My preschooler, John, loves playing with Legos. Unfortunately he gets frustrated because his hands are weak and his fine motor skills aren’t as good as his classmates. Any ideas? – Jane
Hi Jane,
Legos are great for working on many developmentally appropriate skills. Some strategies you can teach your child to make Lego play a little easier include:
LEGO STRATEGIES (Click link to download as PDF) Lego strategies
(Note: Consider practicing on larger Legos first!)
PLACE LEGOS LOWER AND CLOSER TO BODY
Place the legos closer to his body and make sure they are lower than his arms. He can stand up and push down on the Legos for more strength (thanks to the physics of levers – this is true for staplers and similar items as well). That way his entire body is being used for the interlocking of the bricks, compensating for his hand weakness.
USE PALM, NOT FINGERS, TO FULLY INTERLOCK
For the bigger pieces, if interlocking bricks are in correct position, just not fully pushed together, first move the item closer and lower as noted above, then use the flattened palm of hand to press them down firmly. The palm has more force/easier than the fingers. If a tower, it may need to be stabilized with the other hand to prevent tipping over.
TEMPORARILY MOVE UNSTABLE AREAS TO A STABLE AREA TO ADD ON MORE PIECES
If there is empty space beneath part of a Lego due to the design, it can get difficult/frustrating to add onto that Lego area. Temporarily remove that part of the design so that it’s fully on the flat/stable surface. Add on the necessary extra pieces. Then place the entire part back where it belongs.
Jane, I hope this helps. I imagine there are many sites on the Internet that can be explored to find even more ideas. Good luck with John! Therapeutically yours, OT 🙂
PS: There are plenty of OT skills that can be worked on using Legos! Fine motor, visual motor, problem-solving, social skills…let me know if you want more information!
Category: Activities, Clients/Consumers, Occupational Therapy, Parents | Comments: none | Tags: Activities, printable, printables
2
Jan
2014
Cutting/fine motor manipulation/imagination: OT Activity
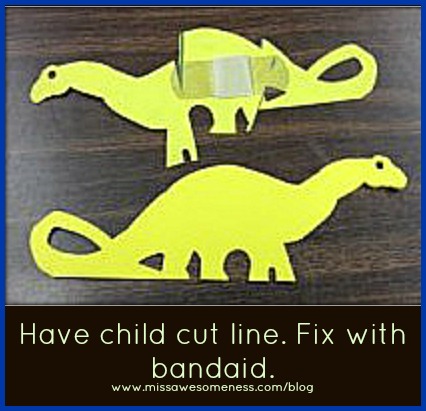
ACTIVITY
1. Take dinosaur post-it or other random animal paper. Child cuts across animal.
2. Child is veterinarian and fixes animal. (Skim over the fact we were directly responsible for its hurt, cough).
3. Give child a band-aid.
4. Child puts animal pieces together in right orientation, secures band-aid.
See below about grading the activity, skills worked on, and extra notes, while I figure out how to add in a “read more” link 🙂
TO GRADE ACTIVITY (change difficulty level) depending on child’s strengths/weaknesses:
Cutting:
Harder: Multiple lines, thinner lines, curvy or wiggled lines, lower contrast lines, more directions, having child make own lines first and cut out own.
Easier: One thick line, high contrast, fewer directions, no line at all, thicker paper (like a manila folder, construction paper, index card), modified scissors
Band-aid:
Harder:Child gets out band-aid and performs rest of task independently or with minimal assistance, no prompting for sequencing
Easier: Open the band-aid or help the process (start it until manageable by child, such as peeling the bandaid pieces a tiny bit apart and child takes over). Help hold the papers down so child can apply bandaid.
Imagination:
Harder: Do not give the child a sample, fewer prompts, encourage playing pretend
Easier: Role model playing pretend yourself only, give child sample
SKILLS worked on with animal band-aid activity:
- Cutting
- Fine motor manipulation (opening and placing bandaid)
- Visuospatial organization (placing pieces back together)
- Imagination/creativity/flexibility (understanding concept via drama/pretend/silliness)
- Life skill (manipulating band-aid)
- Cognition/Problem-solving (figuring out how to use the band-aid and put it all together)
Notes:
1. Be silly/dramatic. Children with mental rigidity can handle this sort of task as it’s concrete enough to make sense, but the imaginative creative piece is helped by silliness. “Oh nooooo our poor dinosaur!! I hope we can fix him!!!”
2. KIDS LOVE BANDAIDS. I didn’t have any cool ones, but that would help even more. If you have more than one type, let them choose. Even children resistant to cutting/directions may complete this task if they see a band-aid is involved!
Category: Occupational Therapy | Comments: none | Tags: Activities, activity, band-aids, cognition, creativity, cutting, dramatic, fine motor, flexibility, imagination, life skill, missawesomeness, Occupational Therapy, OT, problem solving, scissors, sequencing, silly, skills, visual motor, visuospatial organization